마이크로소프트의 Visual Studio Code, Atom IDE, Slack 메신저 등이 웹기반인거 알고 계시나요~?
엥? 그건 윈도우에서 설치해서 사용하는데 어떻게 웹기반인거죠~? 그건 바로 Electron.js를 통해서 가능합니다.
구글 Chrome의 오픈소스 프로젝트인 Chrominum 및 Node.js를 바이너리에 포함시켜 데스크톱 앱으로 실행할 수 있도록 하는 것인데요,
JAVASCRIPT, HTML, CSS를 사용하는 Electron.js를 사용해보면서 좀 더 알아보도록 할께요.

Electron.js, 먼저 설치해볼까요?
먼저, Electron.js를 사용하기 위해서는 Node.js와 npm이 설치되어 있어야 합니다. 제 블로그 글에 링크되어 있는 것이 있으니 참고해주세요.
링크 : 쉽게하는 TypeScript : TypeScript 튜토리얼 따라해보기 링크
Node.js와 npm을 설치하셨다면 Mac에서는 터미널, 윈도우에서는 명령프롬프트(CMD)를 열고 mkdir 명령어를 이용해 어플리케이션 폴더를 생성해주시고 npm init을 이용해 package.json을 생성해주세요.
테스트 해볼 용도이기 때문에 package name부터 license 부분까지는 entry point만 main.js로 넣어주시고, 나머지 항목은 키보드의 Enter를 눌러 그냥 넘겨주시면 됩니다.
$ mkdir my-electron-app && cd my-electron-app
$ npm init
This utility will walk you through creating a package.json file.
It only covers the most common items, and tries to guess sensible defaults.

See `npm help init` for definitive documentation on these fields
and exactly what they do.

Use `npm install <pkg>` afterwards to install a package and
save it as a dependency in the package.json file.

Press ^C at any time to quit.
package name: (my-electron-app)
version: (1.0.0)
description:
entry point: (index.js) main.js
test command:
git repository:
keywords:
author:
license: (ISC)
About to write to /Users/Documents/00_WORKSPACE/01_PYTHON/my-electron-app/package.json:

{
  "name": "my-electron-app",
  "version": "1.0.0",
  "description": "",
  "main": "main.js",
  "scripts": {
    "test": "echo \"Error: no test specified\" && exit 1"
  },
  "author": "",
  "license": "ISC"
}


Is this OK? (yes)
npm notice
npm notice New minor version of npm available! 8.1.0 -> 8.6.0
npm notice Changelog: https://github.com/npm/cli/releases/tag/v8.6.0
npm notice Run npm install -g npm@8.6.0 to update!
npm notice
이제 npm을 이용해서 Electron.js 프로젝트를 만들어볼께요. --save-dev 옵션은 개발시에만 플러그인이 설치되고 실제 Production Level(운영서버)에서는 설치되지 않도록 dependency를 설정하는 옵션입니다. 즉, 개발시에만 사용하는 옵션입니다.
npm install을 하게 되면, node_modules 폴더에 패키지들이 설치되고, dependency가 명시됩니다.
$ npm install --save-dev electron
그리고 아래와 같이 script 부분에 Electron.js를 실행하는 구문을 추가해주세요.
{
  "name": "my-electron-app",
  "version": "1.0.0",
  "description": "",
  "main": "main.js",
  "scripts": {
    "test": "echo \"Error: no test specified\" && exit 1",
    "start": "electron ."
  },
  "author": "",
  "license": "ISC",
  "devDependencies": {
    "electron": "^18.0.1"
  }
}
Electron.js 실행하기
그럼 첫 어플리케이션을 실행해볼까요?
$ npm start
그럼 Electron.js 어플리케이션이 실행이 됩니다. 이야... 이렇게 쉬운가??

하지만... 짜잔!! 하고 오류가 발생하네요. Electron.js를 실행했을 때 main.js 파일의 내용을 읽게 되는데 main.js 파일이 없기 때문이에요. 그렇다면 간단하게 내용을 만들어 볼께요.
Electron.js 실행을 위한 코드 작성
Electron.js 실행을 위한 코드를 작성해볼께요. 테스트 실행을 위해 3개의 파일을 생성할께요.
index.html 파일은 브라우저 화면에 나타나는 코드를 작성합니다.
main.js 파일은 electron 모듈 및 preload.js 파일을 Load 하고, 가로 800, 세로 600의 브라우저 새창을 띄우는 코드가 작성되어있습니다.
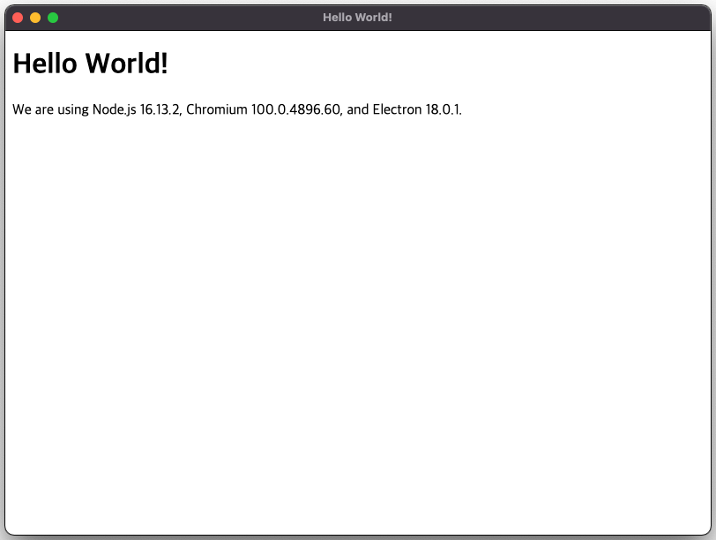
preload.js 파일은 Node.js, Chromium, Electron의 버전을 나타내는 코드가 작성되어 있습니다.
index.html 파일 작성
<!DOCTYPE html>
<html>
  <head>
    <meta charset="UTF-8">
    <!-- https://developer.mozilla.org/en-US/docs/Web/HTTP/CSP -->
    <meta http-equiv="Content-Security-Policy" content="default-src 'self'; script-src 'self'">
    <meta http-equiv="X-Content-Security-Policy" content="default-src 'self'; script-src 'self'">
    <title>Hello World!</title>
  </head>
  <body>
    <h1>Hello World!</h1>
    We are using Node.js <span id="node-version"></span>,
    Chromium <span id="chrome-version"></span>,
    and Electron <span id="electron-version"></span>.
  </body>
</html>
main.js 파일 작성
// main.js

// Modules to control application life and create native browser window
const { app, BrowserWindow } = require('electron')
const path = require('path')

const createWindow = () => {
  // Create the browser window.
  const mainWindow = new BrowserWindow({
    width: 800,
    height: 600,
    webPreferences: {
      preload: path.join(__dirname, 'preload.js')
    }
  })

  // and load the index.html of the app.
  mainWindow.loadFile('index.html')

  // Open the DevTools.
  // mainWindow.webContents.openDevTools()
}

// This method will be called when Electron has finished
// initialization and is ready to create browser windows.
// Some APIs can only be used after this event occurs.
app.whenReady().then(() => {
  createWindow()

  app.on('activate', () => {
    // On macOS it's common to re-create a window in the app when the
    // dock icon is clicked and there are no other windows open.
    if (BrowserWindow.getAllWindows().length === 0) createWindow()
  })
})

// Quit when all windows are closed, except on macOS. There, it's common
// for applications and their menu bar to stay active until the user quits
// explicitly with Cmd + Q.
app.on('window-all-closed', () => {
  if (process.platform !== 'darwin') app.quit()
})

// In this file you can include the rest of your app's specific main process
// code. You can also put them in separate files and require them here.
preload.js 파일 작성
// preload.js

// All of the Node.js APIs are available in the preload process.
// It has the same sandbox as a Chrome extension.
window.addEventListener('DOMContentLoaded', () => {
  const replaceText = (selector, text) => {
    const element = document.getElementById(selector)
    if (element) element.innerText = text
  }

  for (const dependency of ['chrome', 'node', 'electron']) {
    replaceText(`${dependency}-version`, process.versions[dependency])
  }
})
세 파일을 다 작성했으면 이제 다시 npm start로 어플리케이션을 실행합니다.

해당하는 OS의 새창으로 브라우저의 HTML 파일의 내용이 표시되었습니다. Quick Start의 내용이라 어려운 내용은 없으셨을거에요. 추후에 Electron.js를 더 심화해서 알아보도록 할께요.
이 포스팅을 끝까지 읽어주셔서 감사합니다.


댓글